
GUI console
nonodb-cli includes a local browser console. The React build is embedded in the
binary through rust-embed, so the GUI does not require Node.js at runtime.
nonodb-cli guiThe command starts a loopback HTTP server on http://127.0.0.1:8787, opens the
default browser, serves the embedded React application, and proxies API requests
to the daemon over the configured Unix socket or TCP endpoint.
nonodb-cli gui --port 8788nonodb-cli gui --no-openThe server binds to 127.0.0.1 by default. To listen on another interface you
must pass both --host and --allow-remote:
nonodb-cli gui --host 0.0.0.0 --allow-remoteTo enforce daemon bearer-token authentication, point the GUI proxy at the daemon’s TCP listener instead of the trusted Unix socket:
nonodb-cli gui --url http://127.0.0.1:7879Unix sockets are treated as trusted local admin connections, so token auth is not enforced on that path.
Exposing the GUI beyond loopback is only safe with TLS, authentication, and a trusted reverse proxy or tunnel. The GUI itself does not terminate TLS.
Cluster view
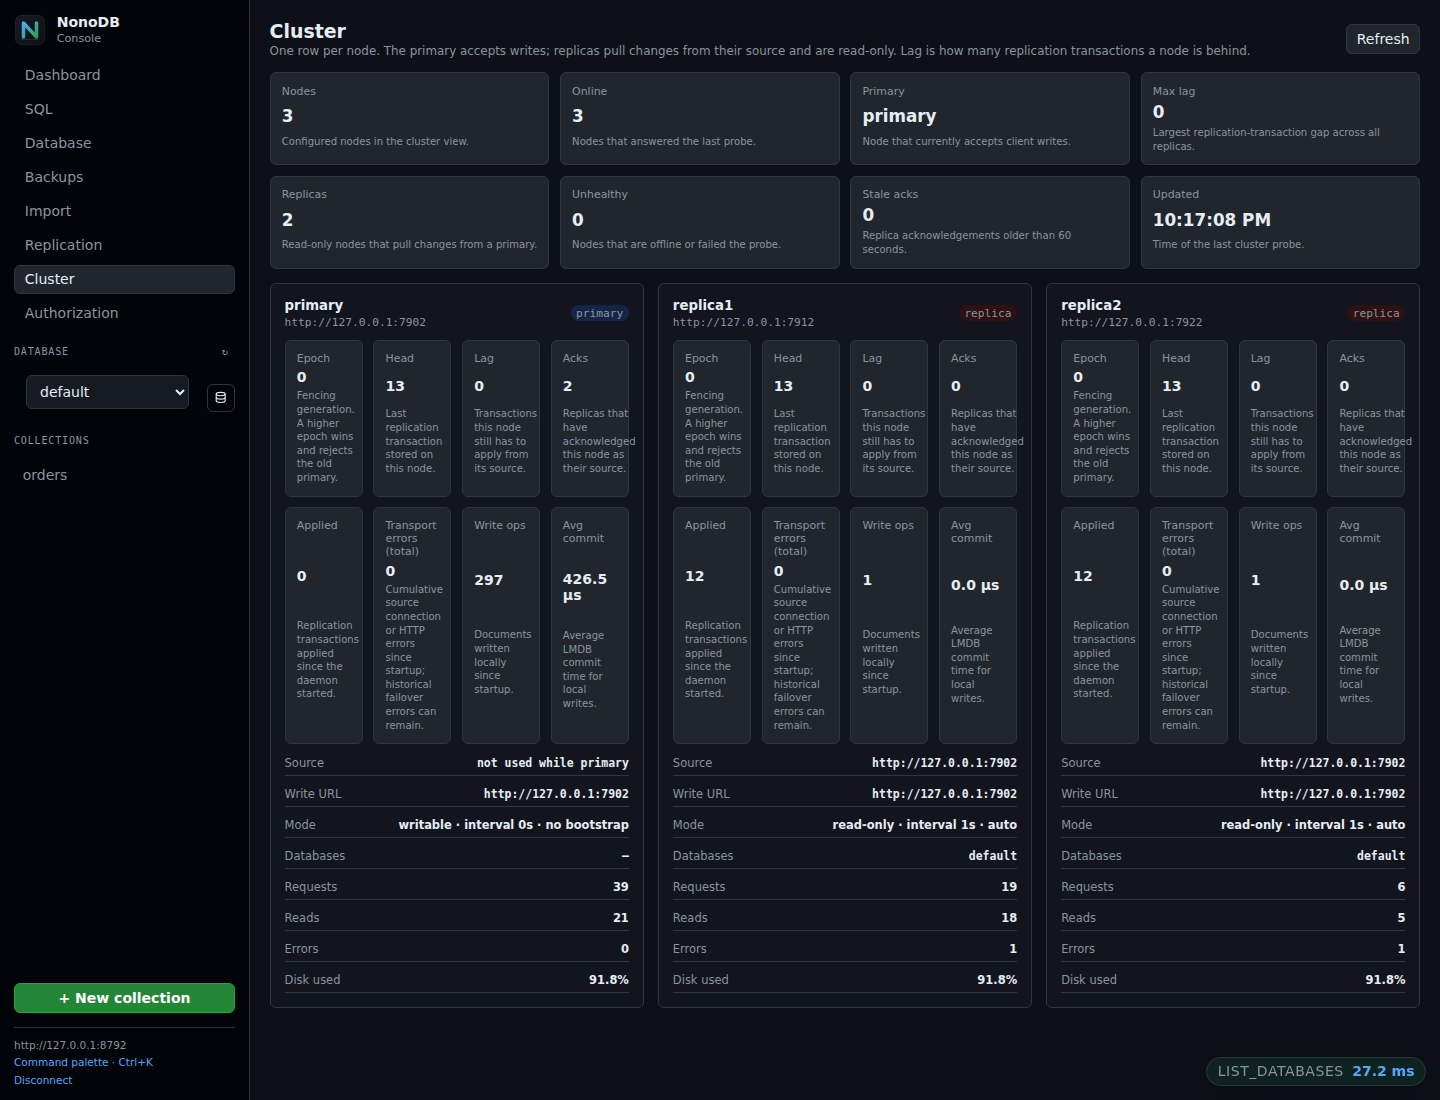
Section titled “Cluster view”The Cluster tab shows every node passed to the GUI with --cluster or
NONODB_GUI_CLUSTER in one place:
nonodb-cli gui --cluster \ primary=http://127.0.0.1:7879,\ candidate1=http://127.0.0.1:7880,\ follower1=http://127.0.0.1:7881For each node it displays role, epoch, head sequence, replica lag, applied transactions, transport/apply errors, source URL, write URL, disk usage, request counts, and average commit time. The view refreshes automatically and marks unreachable nodes as offline.
Use NONODB_CLUSTER_TOKEN when the cluster nodes require a different bearer
token than the GUI’s own NONODB_TOKEN. Cluster probes currently require
http:// URLs; use a local TLS-terminating proxy for HTTPS deployments.
See the Replication and cluster guide for the full primary/replica setup, CLI, failover, and troubleshooting workflow.
Screenshots
Section titled “Screenshots”Overview with the database selector; the example below uses perf1 with one
million documents:
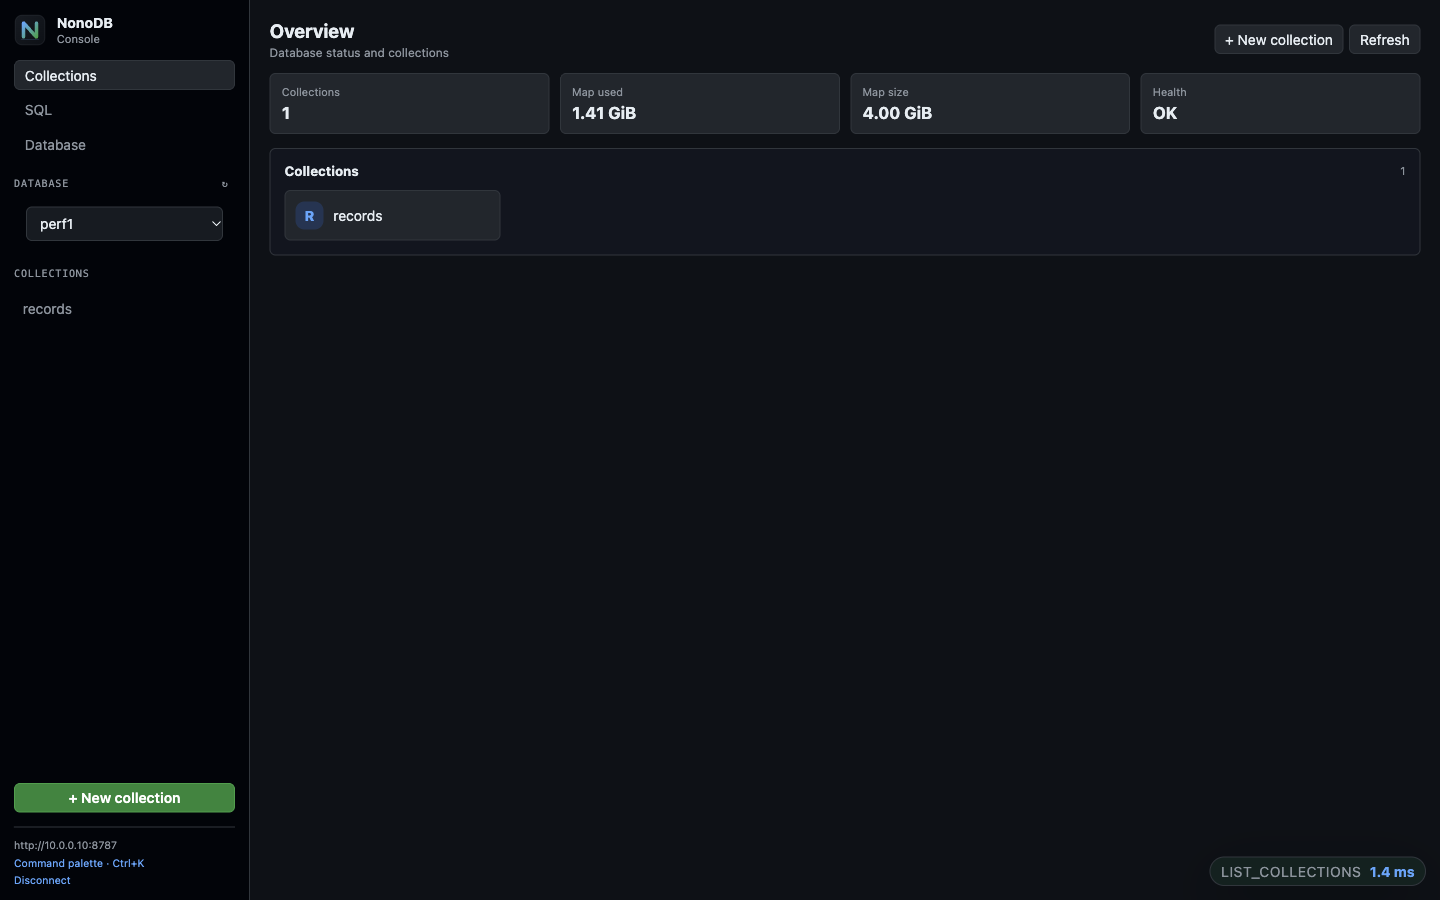
Documents browser with keyset pagination, filters, sorting, and the document editor:
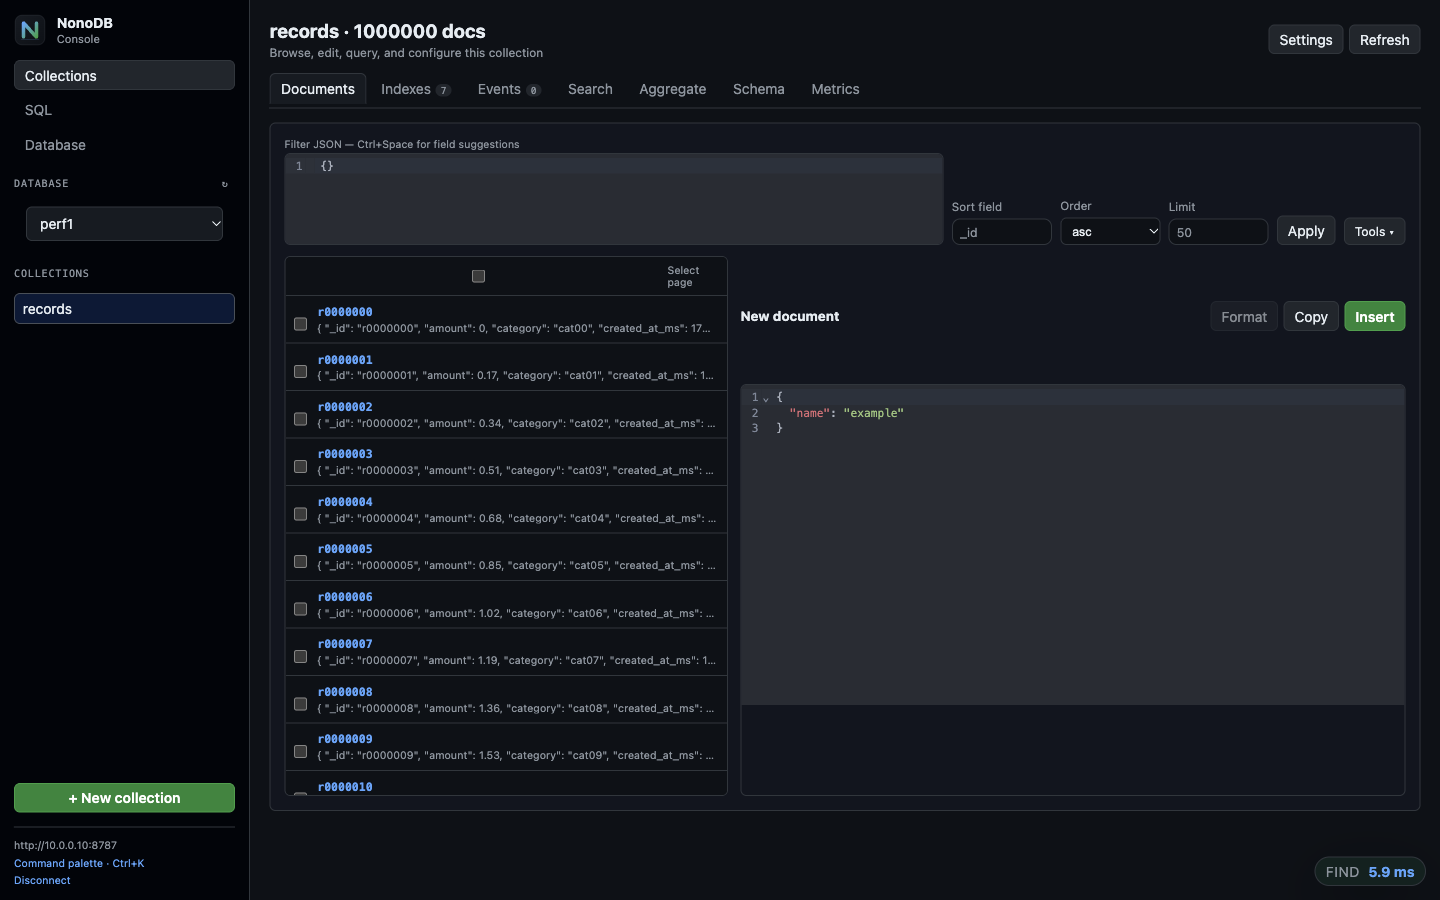
Index management, including the automatic index state and text/vector indexes:
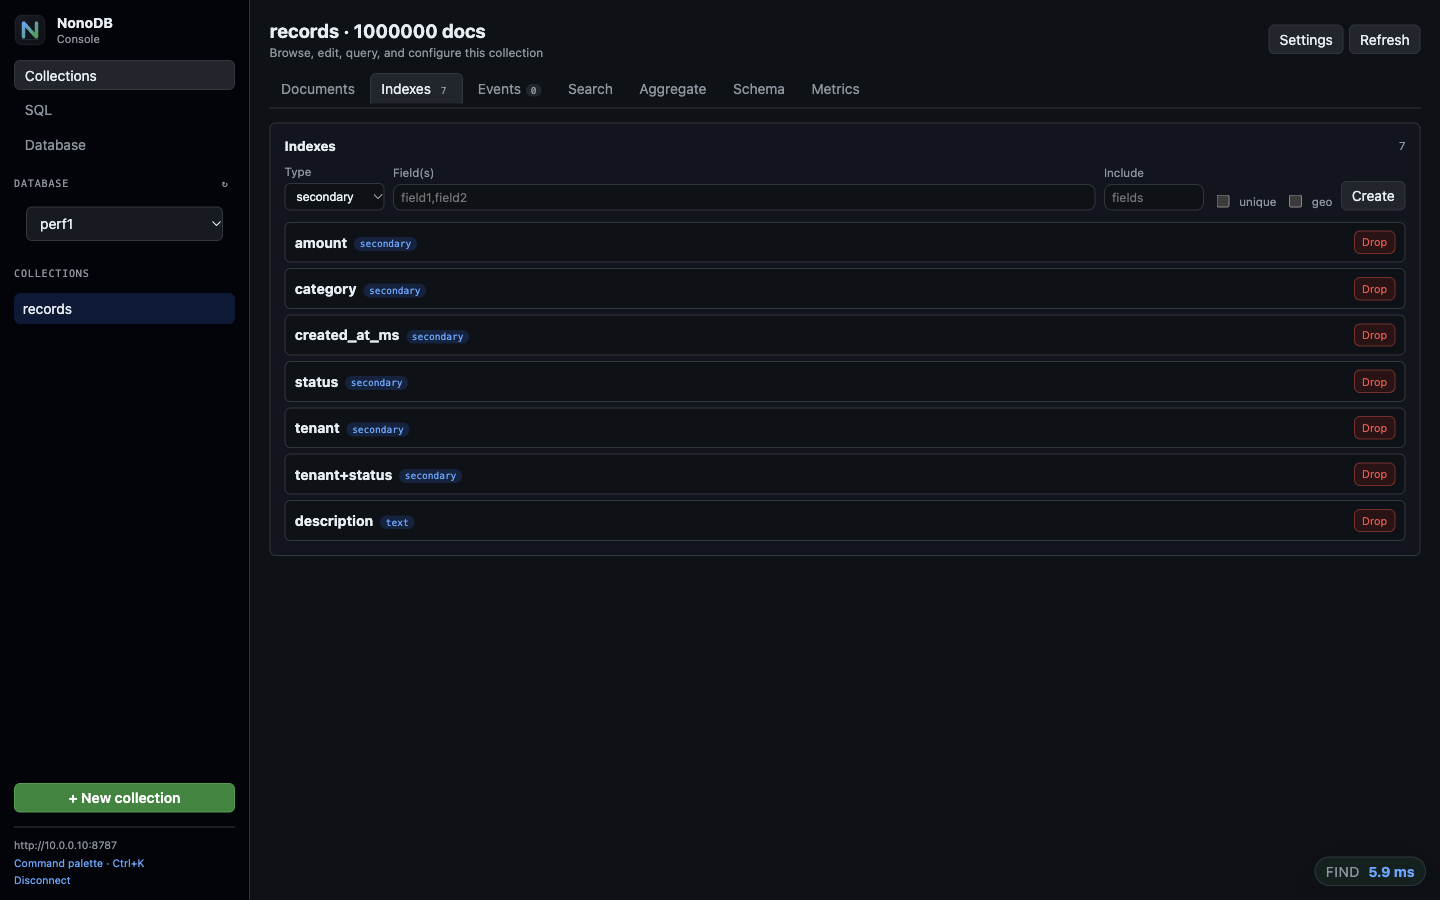
Search console for full-text/fuzzy/vector queries:
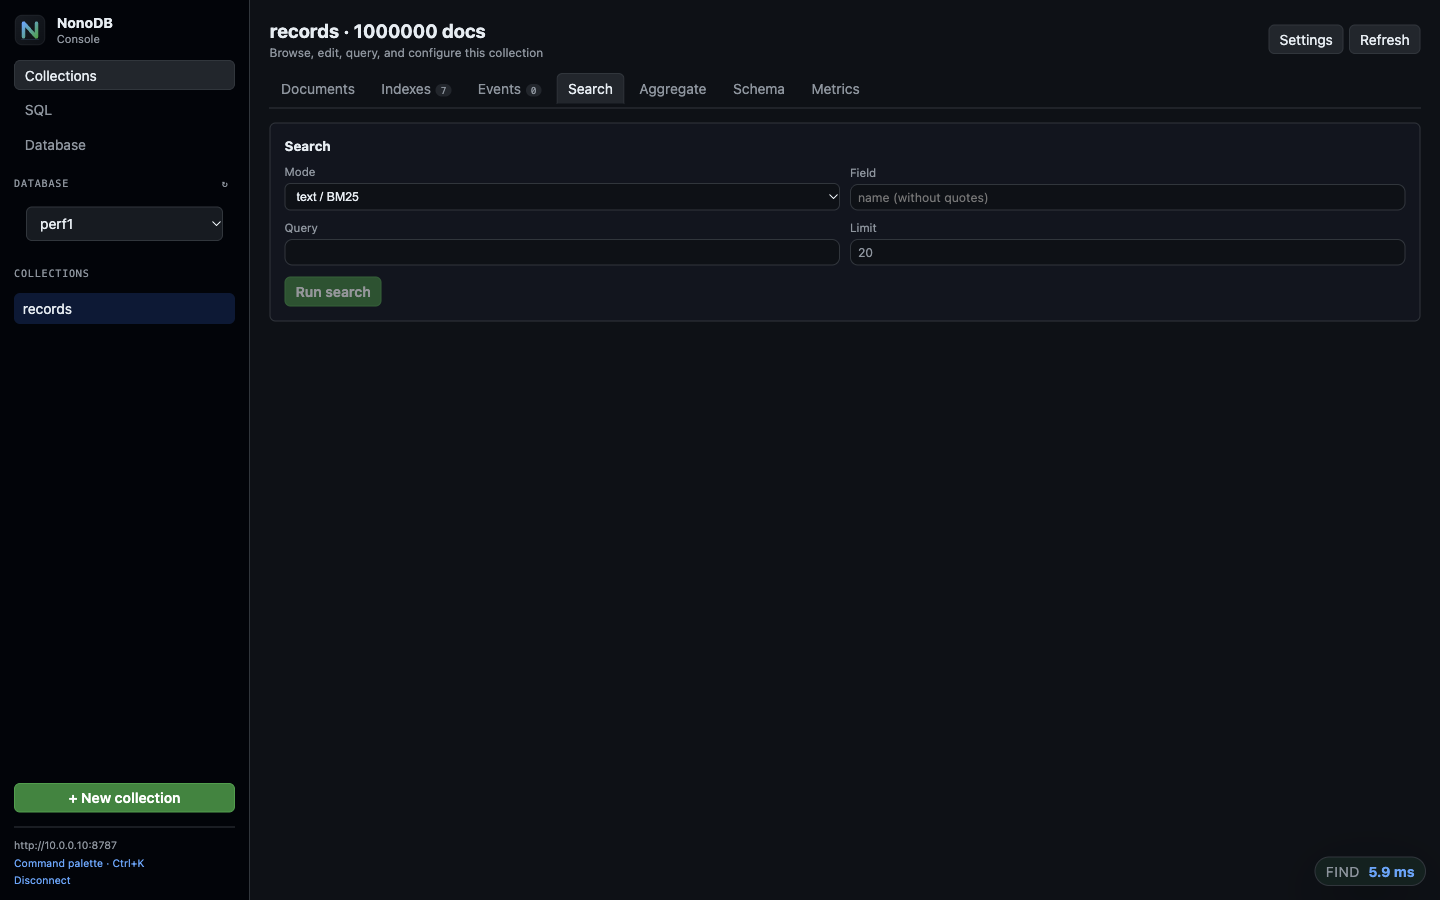
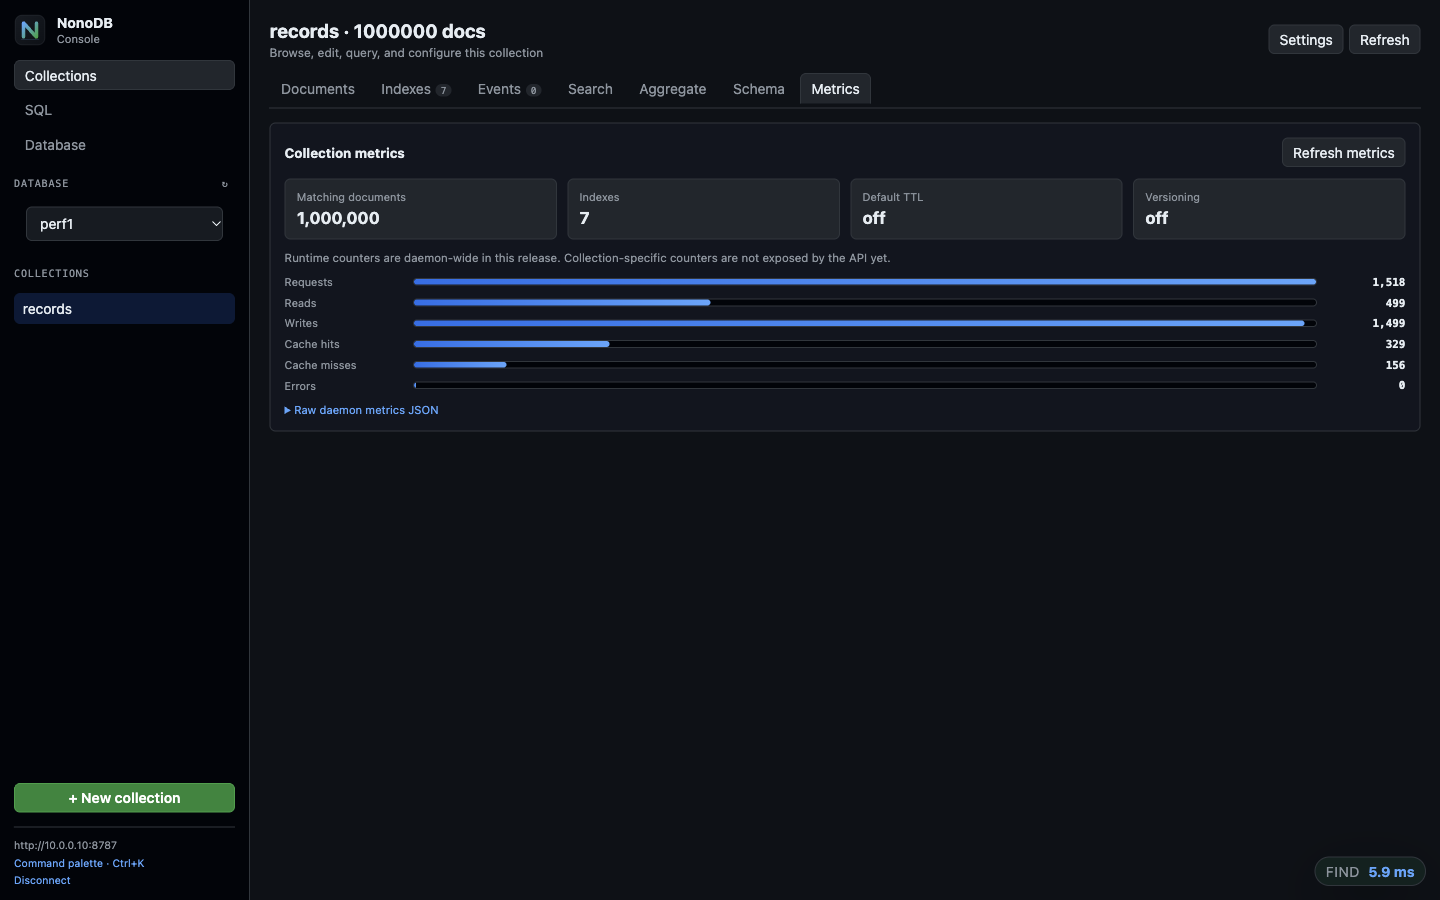
Runtime metrics and time-series samples:
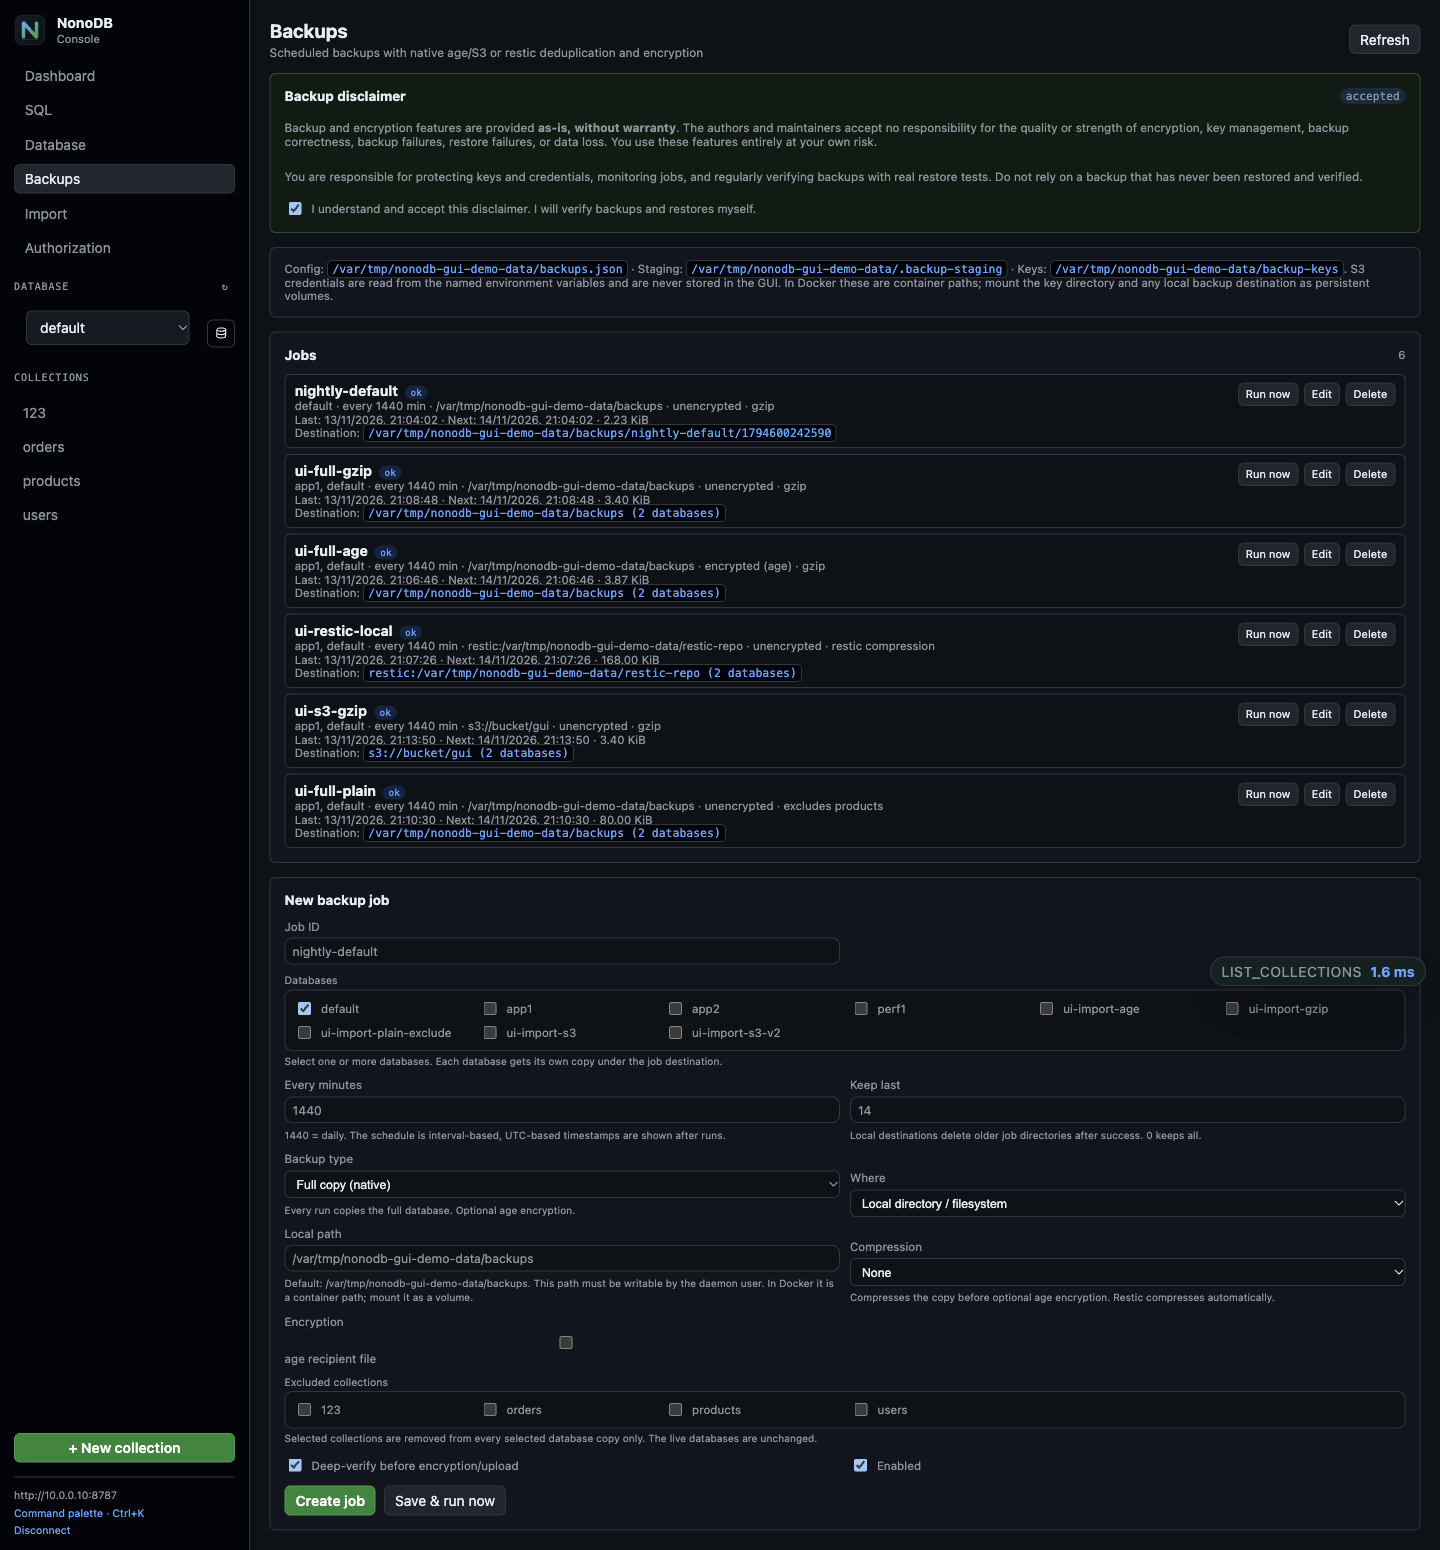
Backup jobs, the required disclaimer, and the last destination path:
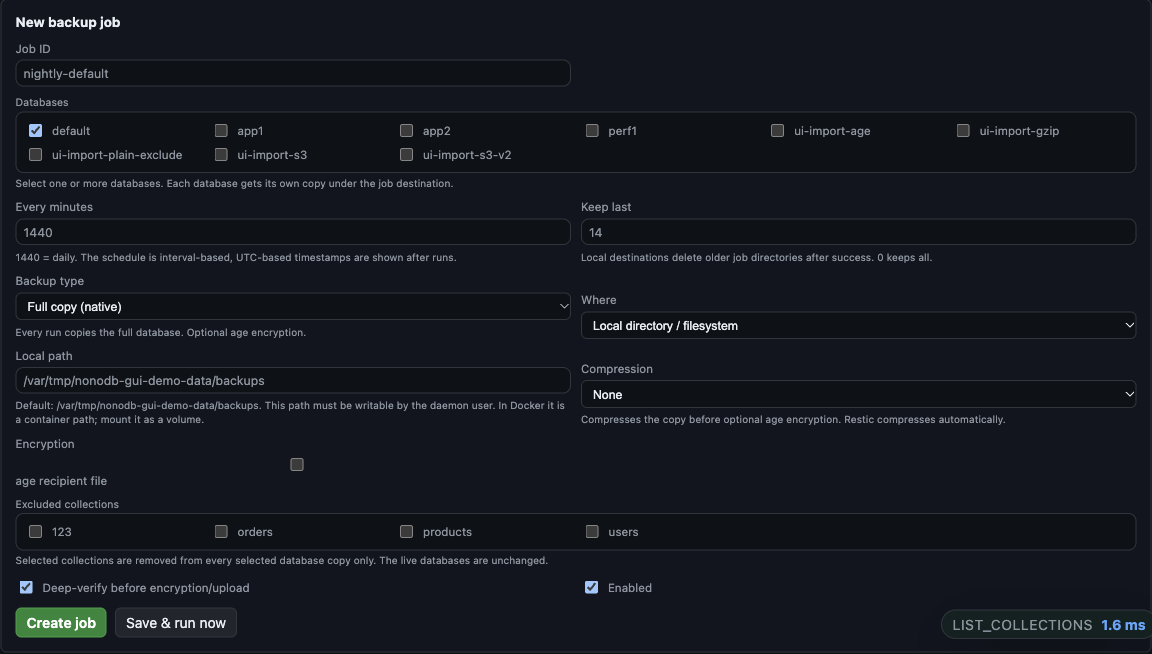
Backup job form with multi-database selection, backup type, destination, compression, encryption, and excluded collections:
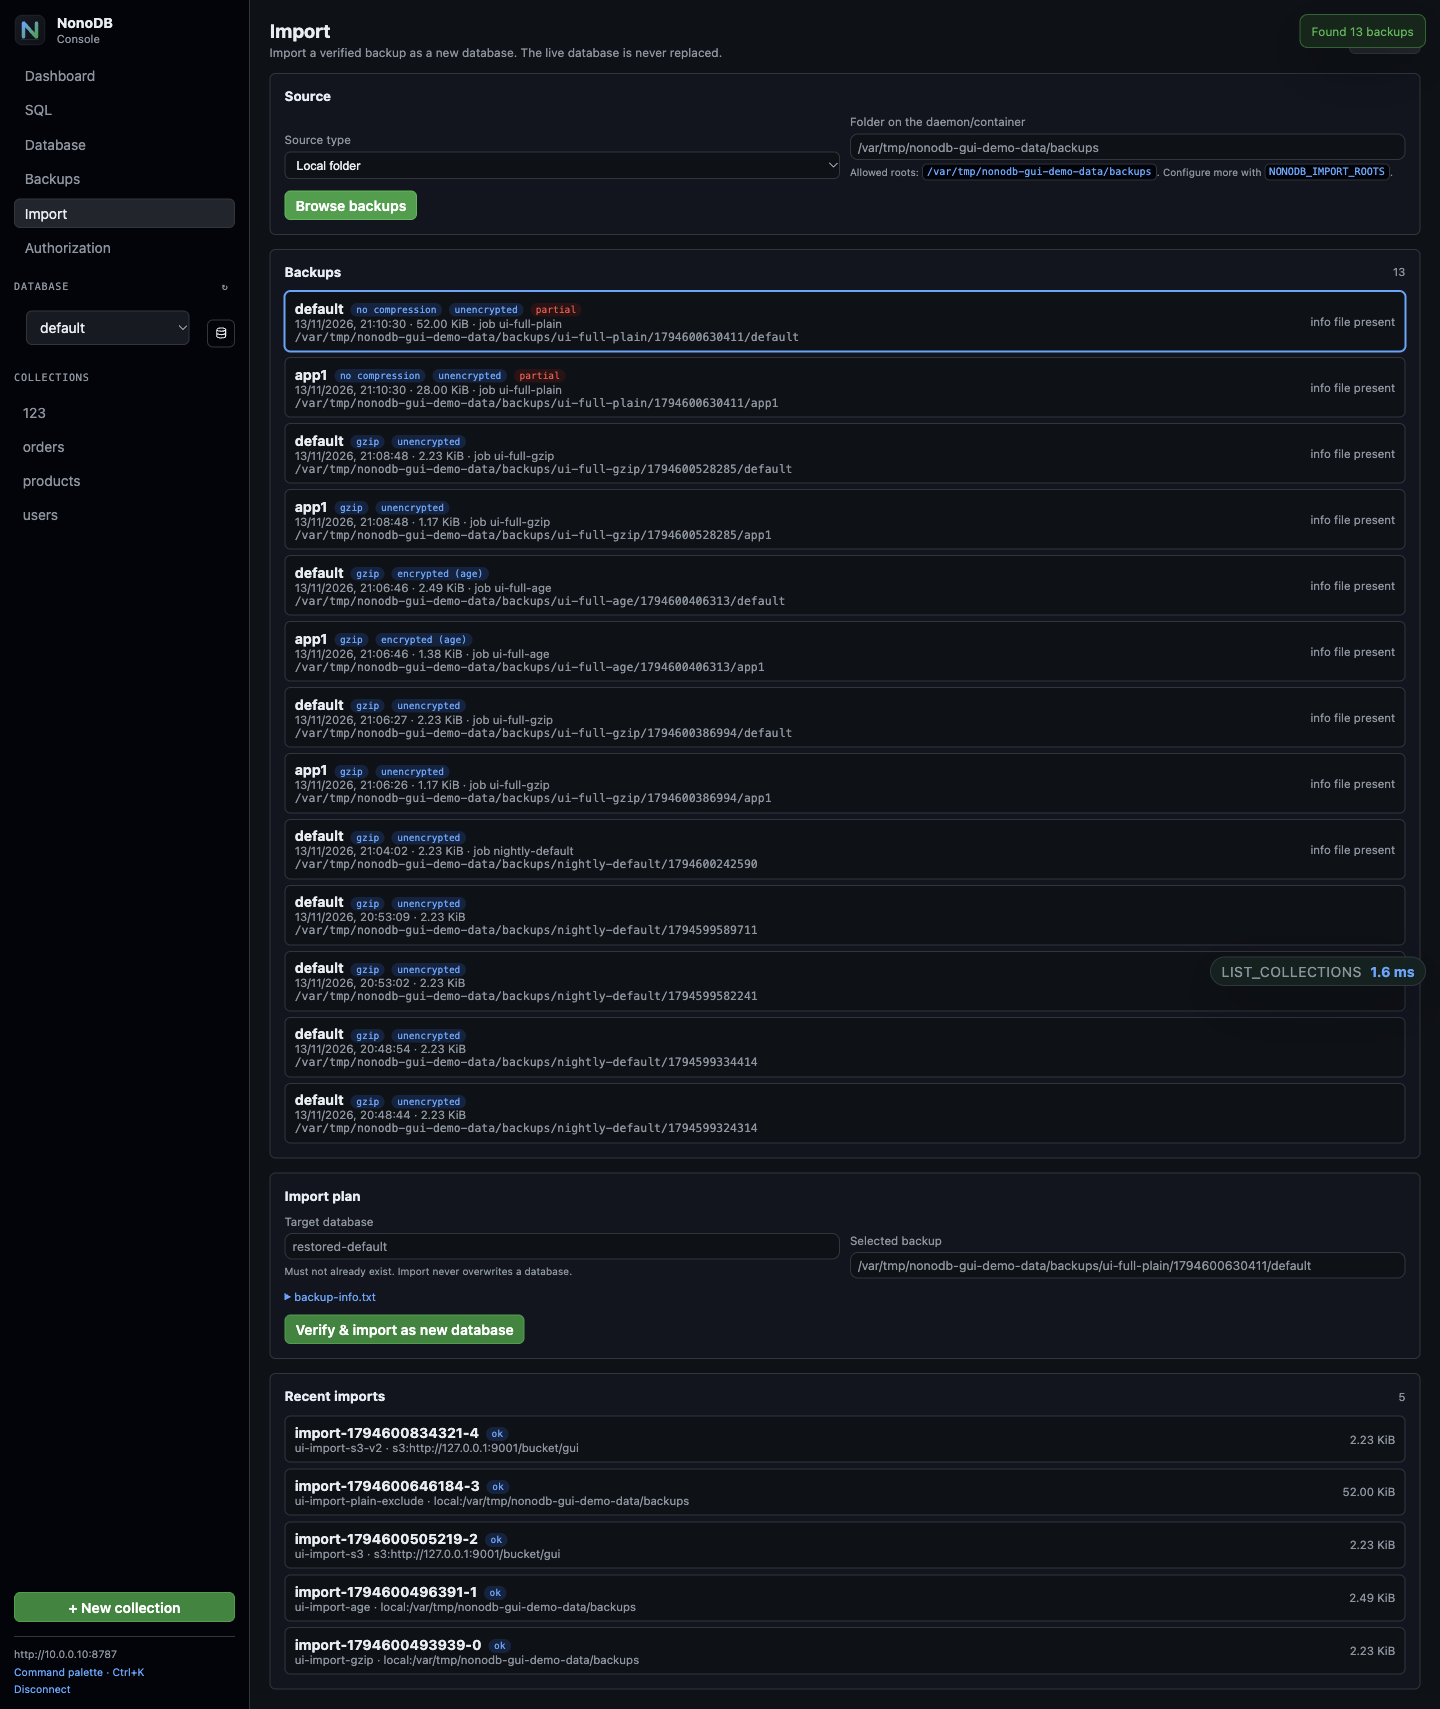
Import wizard showing local/S3 discovery, compression/encryption/partial
status, and backup-info.txt availability:
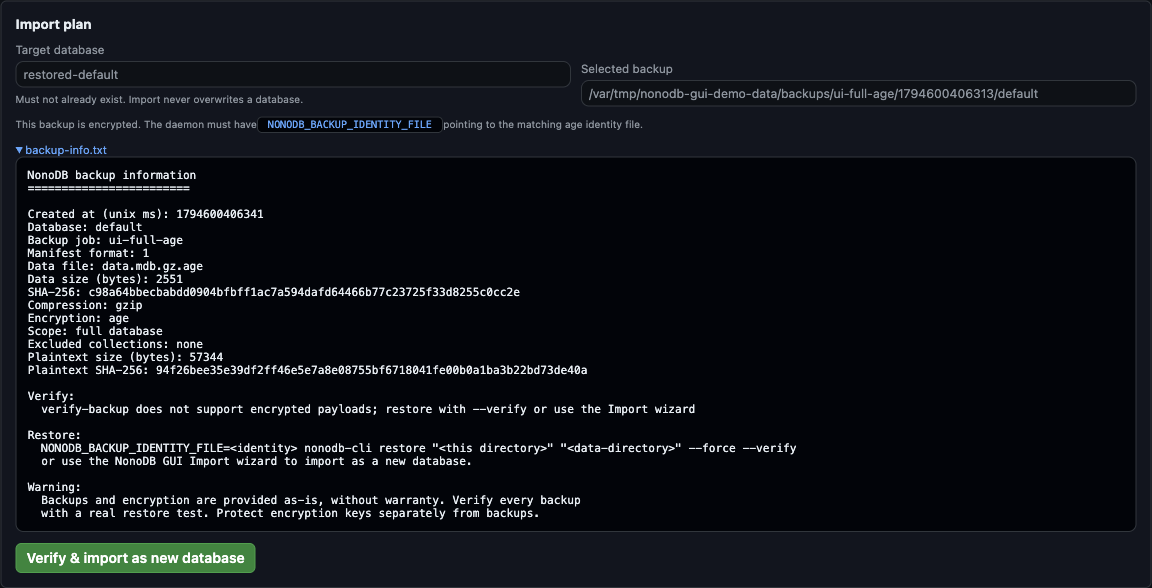
Import plan with target database, selected backup, and the generated
backup-info.txt details:
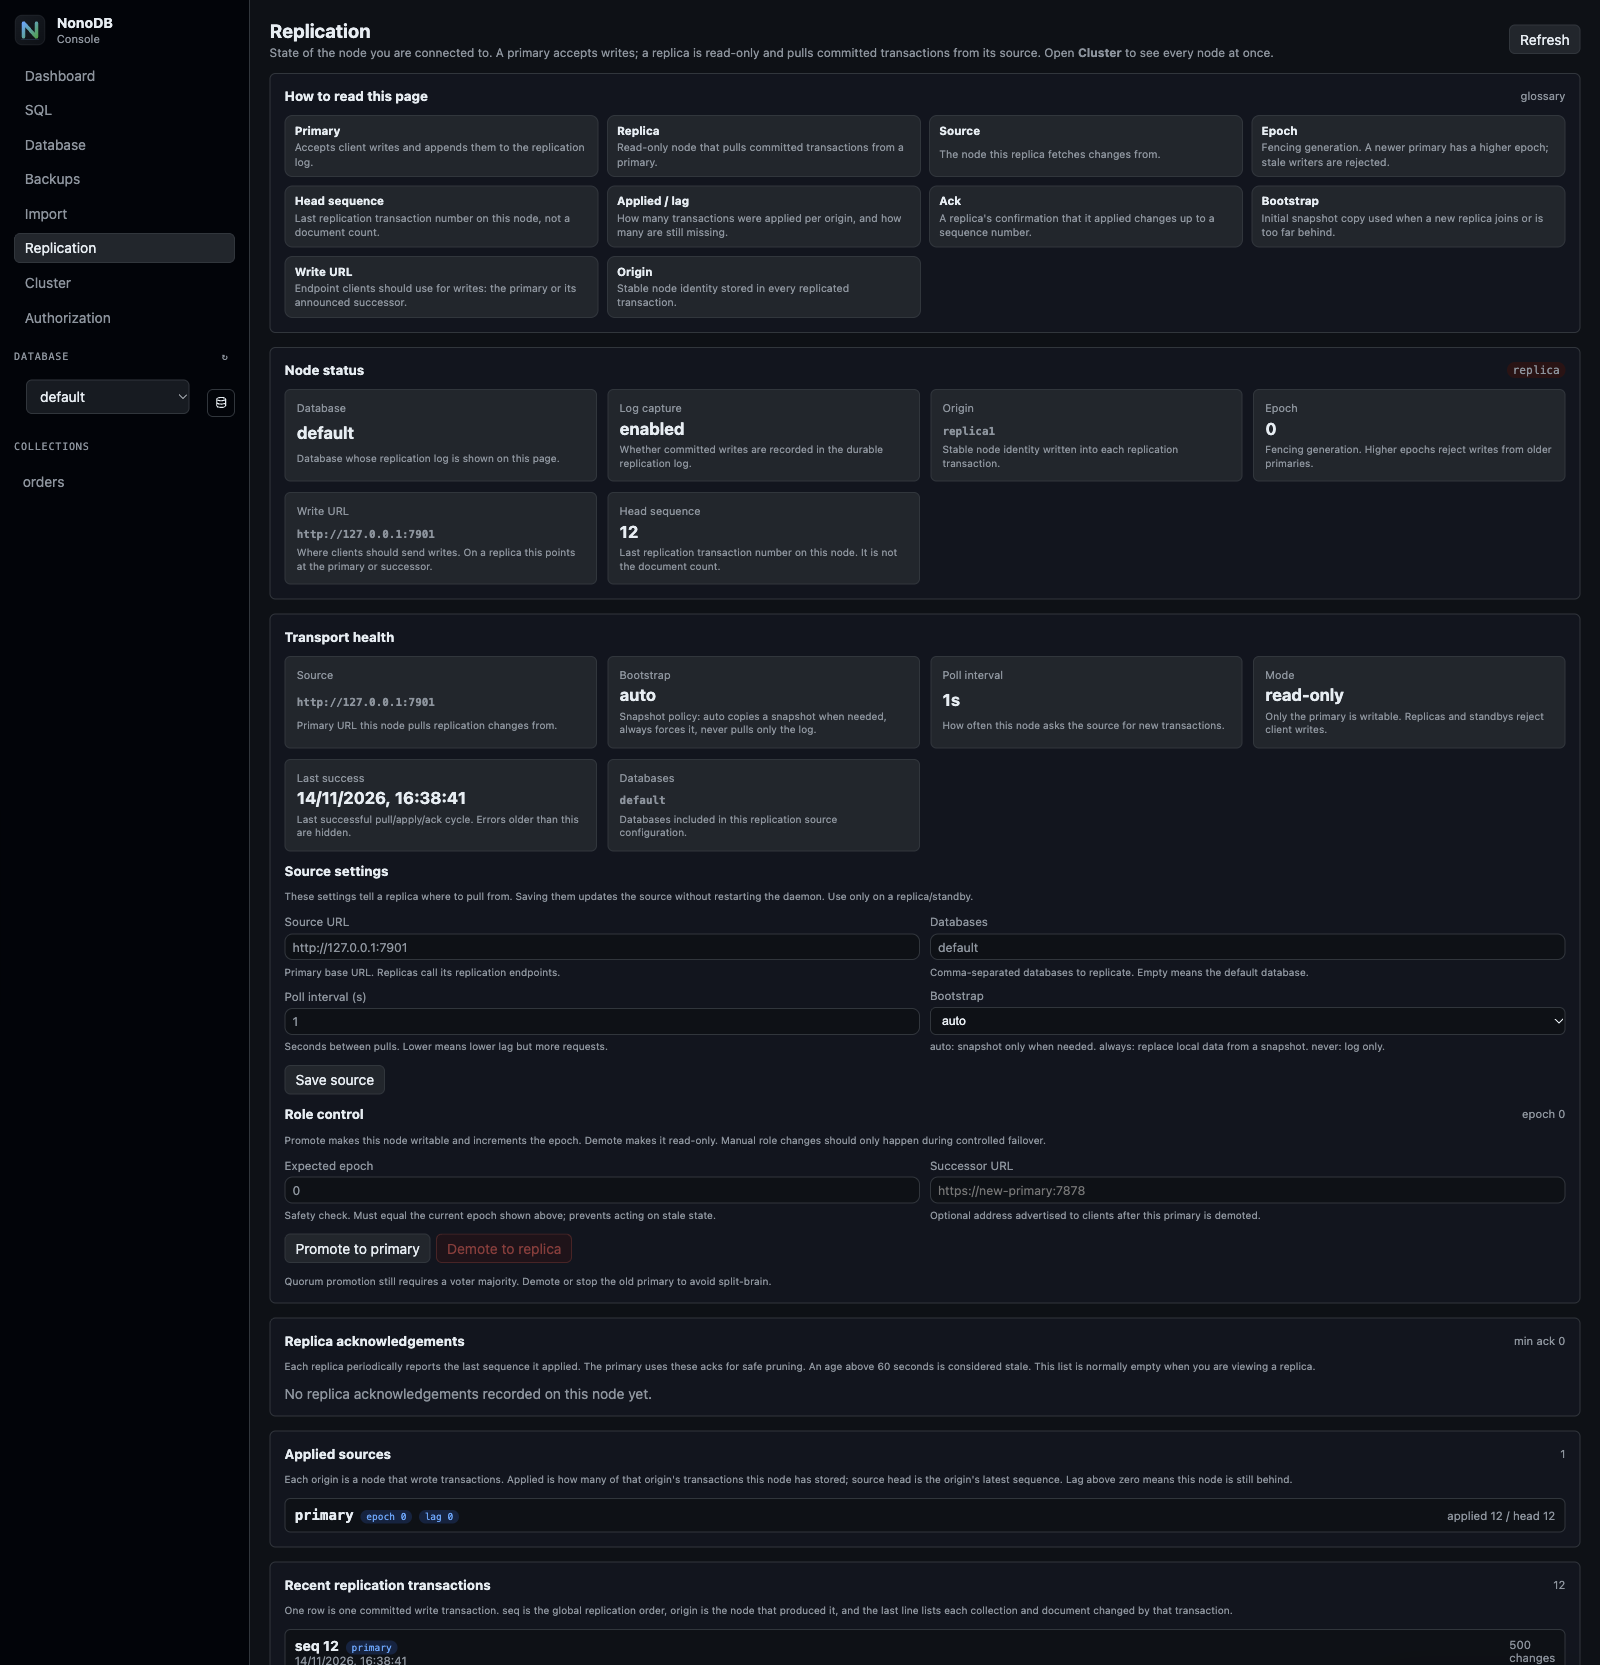
Replication tab with node status, glossary, transport health, source settings, role controls, acknowledgements, and applied sources (the Add replica pairing panel is shown when connected to a primary):
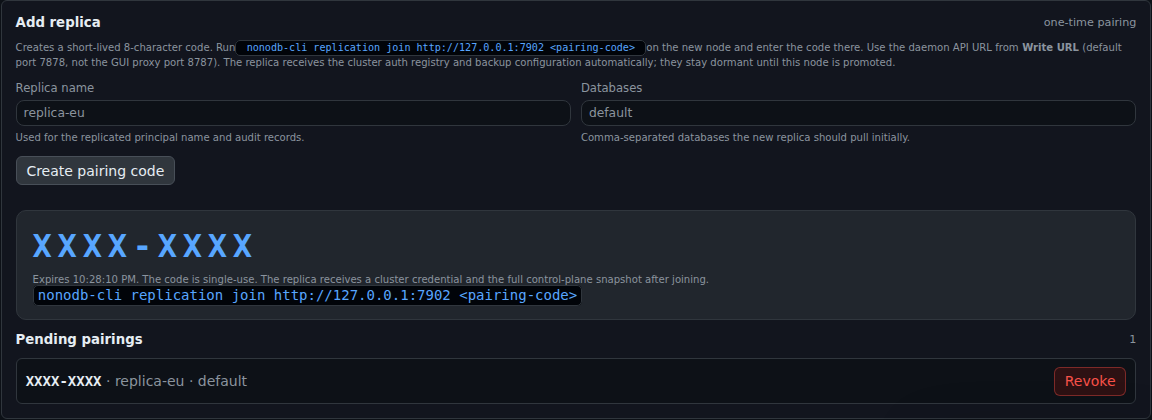
Add replica panel. The command uses this node’s Write URL (here
http://127.0.0.1:7902), not the GUI proxy port:

One-time pairing code and the generated join command. The code is redacted in the documentation; the real code is shown only in the GUI and expires after 10 minutes:
Cluster tab showing every configured node at once: a primary and two live replicas, all online and caught up:
A short walkthrough of switching databases and opening collections:
Download the GUI walkthrough video (MP4, 16 s)
Connection
Section titled “Connection”The GUI uses the same database credential as the CLI and API: a NonoDB bearer token. There is no separate GUI account.
- Local GUI connects without a token when daemon authorization is disabled.
- If the GUI process has
NONODB_TOKEN, the local GUI session endpoint fills the token automatically. - Otherwise enter the token in the single Database token field.
- Vault tenant, key id, key, endpoint, database, and saved profiles are under Advanced.
- The sidebar database selector switches between databases in the same daemon.
Requests are routed as
/<database>/v1/execand/<database>/v1/watch. - The collection list stays visible in the sidebar on every tab. Dashboard shows the selected database overview and metrics; choosing a collection opens its document view.
- The database icon next to the selector opens the Storage view with total database usage and a per-collection table: records, data, indexes, history, TTL, total estimated size, and rolling one-minute traffic. Click a collection row to open that collection’s Metrics tab.
Credentials are kept in browser sessionStorage for the active session. Saved
connection profiles use browser localStorage; do not save production tokens on
a shared machine. Use Disconnect to clear the active session.
Features
Section titled “Features”Documents
Section titled “Documents”- browse with MongoDB-style JSON filters, sorting, pagination, limit, and optional projection;
- visual filter builder with nested AND/OR groups, operators, value types, and a live JSON preview;
- field autocomplete in the filter editor, document editor, sort, index, and search inputs;
- CodeMirror JSON editor with syntax highlighting, folding, validation, format, copy, insert, edit, and delete;
- multi-document selection with bulk delete and bulk field update;
- document history viewer with previous-revision comparison and restore;
- import/export as JSON, NDJSON, or CSV, with optional upsert on import;
- saved per-collection views for filter, sort, projection, and limit.
Indexes
Section titled “Indexes”- secondary and compound indexes;
- unique, include, and geo options;
- text/BM25 indexes;
- fuzzy indexes;
- vector indexes with dimensions and metric;
- index listing and removal for every supported type;
- Reindex all, which rebuilds every index on the selected collection in one write transaction. The GUI asks for confirmation because the rebuild scans the whole collection and blocks writers while it runs.
Events
Section titled “Events”- persistent conditional subscription management;
- create with filter, count condition, operation selection,
once, and lease; - renew and delete subscriptions;
- connection-scoped live event viewer using
mode:"live"; - live events are pushed directly over the stream and are not stored in
_events.
Search
Section titled “Search”- text/BM25;
- fuzzy;
- vector search;
- filter, field, limit, and result viewer.
Text, fuzzy, and vector search require the corresponding index on the field.
Aggregation
Section titled “Aggregation”- JSON aggregation pipeline editor;
- runs
$match,$group,$sort,$project,$limit,$skip,$unwind, and other supported stages; - result viewer and JSON export.
Schema
Section titled “Schema”- inferred field paths from up to 500 sampled documents;
- detected value types and coverage percentage;
- click a field path to add an
$existsfilter.
- SQL console with JSON parameters;
EXPLAINfor SQL;- query history stored in browser localStorage;
- JSON and CSV result export.
Network
Section titled “Network”The Network tab is the only place for listener and host-firewall management:
- Listeners — actual TCP bind, configured
NONODB_TCP, Unix socket, TLS state, and advertised replication URL; - Host firewall — allowed IPv4/IPv6 addresses/CIDRs, NonoDB TCP ports, generated nftables rules, apply/disable controls, and current managed table.
The firewall panel edits only a dedicated inet nonodb_firewall table. It does
not modify SSH or general host policy. Applying requires
NONODB_FIREWALL_MANAGE=1 on the daemon; without it the GUI only previews
rules. If the daemon runs as a non-root service, use NONODB_FIREWALL_SUDO=1
with passwordless sudo for nft.
Always check that the TCP bind is 0.0.0.0 or a LAN address before adding a
remote replica. A 127.0.0.1 bind cannot be reached from another host.
Metrics
Section titled “Metrics”Metrics for the selected database are shown on the Dashboard, not in Database settings.
- database-wide counters, queue, commit, batch, and TTL signals;
- data-disk utilization and snapshot age;
- graphical bars and time-series samples with optional 5-second auto-refresh;
- raw metrics JSON.
Per-collection request/read/write/cache/error counters and latency live in the selected collection’s Metrics tab, not on the dashboard.
Database
Section titled “Database”- LMDB map size, used/free bytes, and page size;
- online map resize;
- database-wide JSON import/export;
- command helper for backup, restore, and verification CLI operations;
- a note explaining that each database is a separate LMDB environment and the selector switches between them;
- The database icon opens the Storage view with per-collection record counts, space usage, and last-minute traffic for the selected database.
Backups
Section titled “Backups”- create, edit, delete, and manually run backup jobs;
- Save & run now next to Create job to save and immediately test a job;
- multi-select database list for backing up several databases in one job;
- multi-select excluded collections, applied to every selected database copy;
- a required backup disclaimer acknowledgment before creating or running jobs;
- Backup type first (full native copy or restic incremental/deduplicated), then Where (local filesystem or S3/Cloudflare R2);
- Compression option for native jobs: none or gzip, applied before optional age encryption; restic compresses automatically;
- local paths default to
<NONODB_DATA>/backupsand<NONODB_DATA>/restic-repo, so the daemon can write them without root; - optional age encryption for native destinations, or restic-managed encryption and deduplication;
- one-time age key or restic password generation; private key material is never displayed or editable in the GUI;
- interval schedule in minutes, retention count, and deep verification;
- last/next run, size, duration, last destination path, and errors;
- automatic refresh while a backup is running and a completion notice with the destination path;
- credentials are read from configured environment-variable names and never stored in the GUI.
Backup workflow
Section titled “Backup workflow”- Open Backups and accept the disclaimer.
- Select one or more databases.
- Choose Backup type: full native copy or restic incremental/deduplicated.
- Choose Where: local filesystem or S3/Cloudflare R2.
- For native jobs choose Compression and optional age encryption.
- Optionally exclude collections; exclusions apply to every selected database.
- Click Create job to schedule it, or Save & run now to test it immediately.
- After a run, inspect the badge, size, and Destination path.
The local destination and key directory default inside NONODB_DATA, so the
daemon can write them without root. In Docker, mount every local destination and
NONODB_BACKUP_KEY_DIR as persistent volumes.
Import
Section titled “Import”- browse local folders under
NONODB_IMPORT_ROOTSor an S3/R2 prefix; - see database, timestamp, size, gzip, age, job, and partial-exclusion status;
- read the generated
backup-info.txtwhen available; - import as a new database with checksum, decryption, decompression, and deep LMDB verification;
- existing databases are never overwritten.
Import workflow
Section titled “Import workflow”- Open Import.
- Choose Local folder or S3 / Cloudflare R2.
- For local imports, use a path under
NONODB_IMPORT_ROOTS(default<NONODB_DATA>/backups). In Docker this is a container path and must be mounted. - Click Browse backups.
- Select the database backup. Check compression, encryption, partial scope, and
backup-info.txt. - Enter a new target database name.
- Click Verify & import as new database.
The importer verifies the checksum, decrypts age with
NONODB_BACKUP_IDENTITY_FILE when needed, decompresses gzip, verifies the LMDB
database, and refuses to overwrite an existing database.
Replication
Section titled “Replication”The Replication tab exposes:
- Add replica: a one-time 8-character pairing code, join command, and
pending-code revocation. On the new node set
NONODB_REPLICATION_ROLE=replica, start it, then runnonodb-cli replication join <primary-api-url> <code>; - node role badge and origin;
- durable log capture status;
- head sequence;
- applied source sequences and lag on replicas;
- current
write_urlfor client/load-balancer routing; - transport source, bootstrap mode, poll interval, paused state, last success, and last transport/apply error;
- Pause replication / Resume replication and Disconnect from source controls on a replica or standby;
- editable source settings saved to the hidden node metadata collection;
- pause/resume and disconnect controls that do not delete local data;
- manual promote/demote with expected epoch, successor URL, and confirmation;
- replica connections with fresh/stale acknowledgements, a connected badge, the minimum safe sequence, and a Forget action for stale rows; the panel refreshes every 3 seconds;
- recent replication transactions with grouped collection/op/id changes.
Pause and disconnect
Section titled “Pause and disconnect”On a replica or standby, Replication → Replication control provides:
- Pause replication — stops pulling and applying new transactions while keeping the source and token for resume;
- Resume replication — restarts the pull loop immediately;
- Disconnect from source — removes the source and token, stops pulling, and leaves the node read-only. Local collections and history are not deleted. Use Promote to primary separately if the node should become standalone.
Reconnecting after a disconnect requires a new pairing code or a manually
configured source. The primary’s Replica connections entry becomes stale
until the replica reconnects.
Cluster discovery and replica URLs
Section titled “Cluster discovery and replica URLs”A replica can advertise its own API URL in every acknowledgement:
NONODB_REPLICATION_ADVERTISE_URL=http://10.0.0.50:7912When set, the primary stores the URL with the ACK. The GUI asks the primary for
the current replica roster and automatically probes advertised http:// URLs,
so a dynamically joined replica can get a full Cluster card without being
listed in --cluster at GUI startup.
If the replica has no advertise URL, or the URL is not reachable from the GUI host, it still appears under Replication → Replica connections and under Cluster → Dynamic replica connections with node id, sequence, and ACK age, but without metrics or disk details.
Add a replica from the GUI
Section titled “Add a replica from the GUI”The Add replica panel creates a one-time code and shows the exact join
command for this primary. Use the URL shown under Write URL — for example
http://127.0.0.1:7902 in a local demo. The default daemon API port is 7878,
but a non-default NONODB_TCP port is valid. Never use the GUI proxy port
(8787 by default): replication join talks to the daemon API, not the GUI.
- Open Replication on the primary.
- Enter a replica name and the initial databases (comma-separated).
- Click Create pairing code.
- Copy the join command and the one-time code.
-
On the new node, create its own auth file, then start the daemon with
NONODB_REPLICATION_ROLE=replicaand an emptyNONODB_DATA:Terminal window NONODB_AUTH_FILE=/etc/nonodb/replica-auth.json nonodb-cli auth initDo not set
NONODB_REPLICATION_SOURCE,NONODB_REPLICATION_SOURCE_TOKEN, orNONODB_REPLICATION_DATABASESfor a paired replica. The join command installs them from the primary. -
Run the copied command against the local replica daemon:
Terminal window NONODB_SOCK=/run/nonodb-replica.sock \nonodb-cli replication join http://<primary-host>:<daemon-port> <code> -
The replica becomes read-only, receives the cluster auth registry, backup configuration, database catalog, and starts pulling. The CLI prints
Connected to the cluster.with the node id, source, databases, and local role. Verify withnonodb-cli replication statusandnonodb-cli ready. The primary’s Replica connections panel updates within a few seconds and shows the node as connected after its first acknowledgement. -
Revoke unused codes in the Pending pairings list. Codes are single-use and expire after 10 minutes.
Replica in Docker
Section titled “Replica in Docker”Docker NAT hides the container’s 172.x address from the primary, so set
NONODB_REPLICATION_ADVERTISE_URL to the Docker host’s LAN address and publish
the daemon API port. Initialize an auth file before starting the daemon because
TCP requires NONODB_AUTH_FILE at startup; the cluster auth registry replaces
it after the replica joins.
docker volume create nonodb-replica-datadocker volume create nonodb-replica-run
docker run --rm \  -v nonodb-replica-data:/var/lib/nonodb \  -e NONODB_AUTH_FILE=/var/lib/nonodb/auth.json \  ghcr.io/essmos/nonodb:0.26.0 \  nonodb-cli auth init
docker run -d --name nonodb-replica \  -p 7912:7878 \  -v nonodb-replica-data:/var/lib/nonodb \  -v nonodb-replica-run:/run/nonodb \  -e NONODB_AUTH_FILE=/var/lib/nonodb/auth.json \  -e NONODB_TCP=0.0.0.0:7878 \  -e NONODB_REPLICATION_ROLE=replica \  -e NONODB_REPLICATION_NODE_ID=replica-docker \  -e NONODB_REPLICATION_ADVERTISE_URL=http://DOCKER_HOST_IP:7912 \  ghcr.io/essmos/nonodb:0.26.0
docker exec nonodb-replica nonodb-cli replication join \  http://PRIMARY_HOST:7878 PAIRING-CODE
docker exec nonodb-replica nonodb-cli replication status
Replace DOCKER_HOST_IP, PRIMARY_HOST, and PAIRING-CODE with the values for
your network. Do not advertise 127.0.0.1 or the container’s 172.x address,
and use the primary daemon API port, not the GUI proxy port.
Replicas also receive the cluster auth registry, backup jobs/state, database
catalog, and cluster peer token. They remain read-only and do not run backup,
TTL, history-pruning, or subscription services until promoted. When log capture
is disabled, the tab shows the required NONODB_REPLICATION_ENABLED and
NONODB_REPLICATION_ORIGIN settings.
Authorization
Section titled “Authorization”- principal list with database-qualified scopes and edit/delete controls;
- one-time bearer token creation with an explicit copy-once warning;
- token enable/disable;
- mTLS certificate registration and enable/disable;
- last-enabled-administrator protection and referenced-principal checks.
Navigation
Section titled “Navigation”- saved connection profiles;
- command palette (
Ctrl+K) for navigation and collection switching; - toast notifications;
- recent operation log with backend-side timings.
Timings
Section titled “Timings”The local GUI proxy adds an x-nonodb-server-ms response header measured around
the daemon request. The bottom-right timing badge and the recent-operation log use
that value, so they show backend time plus local socket overhead rather than full
browser round-trip time. Direct connections without the local proxy fall back to
client-side timing.
Collection settings
Section titled “Collection settings”Settings are edited in a focused dialog:
- default document TTL in seconds, with an explanation;
- versioning / history retention (
0disables history); - automatic collection events.
Multiple databases
Section titled “Multiple databases”One daemon can host several independent databases, each with its own LMDB
environment under NONODB_DATA/<database>/. The sidebar selector switches the
active database and the GUI routes requests to
/<database>/v1/exec and /<database>/v1/watch; default uses the same
routes. No second daemon, socket, port, or GUI instance is needed.
Databases are created and dropped with the CLI or the management API, and the Import wizard can create one by importing a backup. The GUI does not expose a standalone “new database” button:
nonodb-cli databases create app1nonodb-cli databases listnonodb-cli databases drop app1Each database has separate collections, indexes, TTL/history/event settings, and subscriptions. Collections and queries never span databases.
Docker
Section titled “Docker”The image includes the GUI. Compose can start it as an optional sidecar sharing the daemon’s Unix socket:
docker compose -f deploy/docker-compose.yml --profile gui up -dOpen http://127.0.0.1:8787. The Compose mapping publishes only to loopback. The
GUI container runs:
nonodb-cli gui --host 0.0.0.0 --port 8787 --allow-remote --no-open0.0.0.0 is required inside the container so Docker can forward the published
port; the host mapping remains 127.0.0.1:8787:8787.
With plain Docker:
docker run -d --name nonodb-gui \ -p 127.0.0.1:8787:8787 \ -v nonodb-run:/run/nonodb \ -e NONODB_SOCK=/run/nonodb/nonodb.sock \ ghcr.io/essmos/nonodb:0.26.0 \ nonodb-cli gui --host 0.0.0.0 --port 8787 --allow-remote --no-openThe GUI sidecar needs the daemon’s socket volume. Do not publish 8787 on
0.0.0.0 without TLS and authentication in front of it.
How the local proxy works
Section titled “How the local proxy works”browser ──HTTP──▶ 127.0.0.1:8787 (nonodb-cli gui) │ ├── embedded React assets ├── /v1/exec, /healthz, /metrics └── /v1/watch (streamed) │ ▼ nonodb-daemon Unix socket or TCPThe browser uses one origin, so there is no CORS setup. Authorization headers and
vault headers are forwarded to the daemon. The daemon remains the authority for
all scopes and permissions. The local proxy streams /v1/watch instead of
buffering the whole response.
The GUI source lives in gui/ (Vite + React + TypeScript). To rebuild the
embedded assets:
cd guinpm cinpm run buildThen rebuild the CLI:
cargo build --release -p nonodb-cliCI and Docker build the GUI before compiling nonodb-cli. A committed
gui/dist/.gitkeep keeps a fresh checkout compilable before the frontend build
runs.
Limitations
Section titled “Limitations”- Whole-collection deletion is not exposed yet.
- Import currently supports full-database import from native local/S3 backups; selective collection import, restic repository import, and replace-in-place restore are not exposed in the GUI.
- Multi-connection profiles exist, but simultaneous multi-daemon tabs do not.
- A light theme is not included.
Future GUI work
Section titled “Future GUI work”These are planned improvements, not current features.
- Database management in the GUI. Create and drop databases directly from the console; today the GUI can select databases but creation/drop is CLI-only.
- Backup and restore UI. Trigger online backups, list manifests, verify checksums, and show restore instructions. Restore itself remains CLI-only until a safe daemon-side restore flow exists.
- Multiple daemon tabs. Keep several connection profiles open at once instead of switching one active connection.
- Progress and resume for large imports. Stream import progress, allow cancellation, and resume large JSON/NDJSON/CSV imports.
- Better large-result handling. Virtualized document lists and resumable cursors for very large collections.
- Light theme. The current console is intentionally dark-only.
- Accessibility and keyboard navigation. Improve focus management, ARIA labels, and shortcuts beyond the command palette.
- Shareable saved views and filters. Export/import saved views without sharing credentials.
Security notes
Section titled “Security notes”- The GUI server listens on loopback by default.
- Non-loopback binding requires explicit
--allow-remote. - Static assets are served with CSP,
nosniff, and no-referrer headers. - Tokens are never embedded in the frontend bundle.
- The GUI hides actions on API errors, but the daemon still enforces read, write, and admin scopes.
- Do not expose the local GUI port through a reverse proxy without TLS and authentication.
- For remote access, prefer a Cloudflare Tunnel or another authenticated HTTPS
tunnel; do not expose
http://127.0.0.1:8787directly.